

0
Owner's of the Sonos Speaker Sonos The Wireless HiFi System gave it a score of 0 out of 5. Here's how the scores stacked up:


Product Guide
22
3.
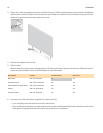
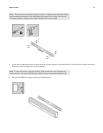
Use an awl or other sharp object to punch 4 small holes through 4 of the marked locations on the template. (If additional
reinforcement is desired, 2 spare screws and anchors are included in the wall mount kit.) Placement may vary but holes
should be located toward the corners, away from center.
4.
Remove the template from the wall.
5.
Drill pilot holes.
Because the anchors and screws are designed to be self-starting, this step is optional. However pre-drilling will result in
a more accurate installation. Refer to the table below for more information.
6.
Insert and secure the wall anchors (supplied in the wall mount kit).
• If you are drilling into wood stud, do not use the wall anchors.
• If you are drilling into Sheetrock, screw the wall anchors into the drywall with a Phillips head screwdriver until the head
is flat against or slightly below the wall surface, being careful not to overtighten.
Wall Material Pre Drill Use Wall Anchors Use Screws
Wood Stud with 1/8” (3mm) bit No Yes
Drywall (no stud) with 3/16” (4.5mm) bit Yes Yes
Hard wallboard or double board with 3/16” (4.5mm) bit Yes Yes
Plaster with 1/4” (6.5mm) bit Yes Yes
Concrete or Brick with 1/8” (3mm) bit Yes Yes


Find Your Products By Category
Please Login
