
0
Owner's of the Sonos Speaker Sonos The Wireless HiFi System gave it a score of 0 out of 5. Here's how the scores stacked up:


SONOS PLAYBAR
21
Wall Mounting
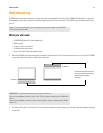
PLAYBAR can be wall mounted above or below your wall-mounted television using the PLAYBAR Wall Mount Kit. To preserve
audio quality, ensure the connector panel faces away from the TV when mounted—the SONOS logo should be farther from
your TV.
What you will need
• PLAYBAR Wall Mount Kit (sold separately)
• Masking tape
• An awl or other pointed tool
• A Phillips head screw driver
• Power drill with Phillips head attachment
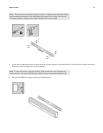
1.
Hold the PLAYBAR wall mount template (included in the wall mount kit) in the desired position on your wall. The PLAYBAR
can be mounted either above or below your television.
2.
Use a level (included in wall mount kit) to ensure the template is horizontally level, and then tape the template securely
to the wall.
Note: It is recommended that you connect the power and audio cables to the PLAYBAR
before mounting on the wall.
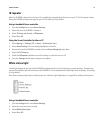
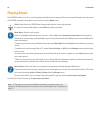
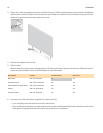
IMPORTANT: For optimal audio performance, Sonos recommends:
When mounting below a television, allow 1 inch (25mm) clearance between the PLAYBAR and
the TV.
When mounting above a television, allow 2 inches (50mm) clearance between the PLAYBAR
and the TV.
For best audio performance, be
sure the connector panel faces
AWAY from the TV when
mounted.
1 “(25mm)
2“(50mm)


Find Your Products By Category
Please Login
